Amazon Relational Database Service (Amazon RDS) makes it easy to set up, operate, and scale a relational database in the cloud.In this article we will explain about creating a mysql database using aws RDS.
From AWS RDS dashboard click on instances > Then click on Launch DB instances.
First we need to select engine.Here we will go with Mysql engine.Then click next.On the next window appears we will select our use case.We will go with Production-Mysql and click next.
On the next window that appears we can select various options such as mysql version ,instance class,storage type,size multi-az deployment and so on.Here we selecting t2-micro as size, storage type as general purpose SSD and mysql version as mysql 5.6.39.Also we are not going with multi-AZ deployment.We can also see estimated cost over here.
Under settings we can give the db identifier name.Also we can give username and password for it.
Under network and security give the details about subnet and vpc. Here we are giving subnet and vpc which is already created.Also we can give public accessibility.Here we are giving yes since we want to access database from outside the vnet. Also we want to select security group for our rds instance.
In database options, we can give the name of database which is to be created and also port number.If we don't want any default database leave it blank.
On the next step we have to select our database is to be encrypted or not.
Under backup we want to select the number of days in which backup to be take place.Her we are selecting 7 so that once in 7 days the backup will occur.Also we can select the time for that.
On next option we can disable or enable monitoring.Here we are disabling monitoring.On log options we can enable logs if we want.Here we are not enabling that.
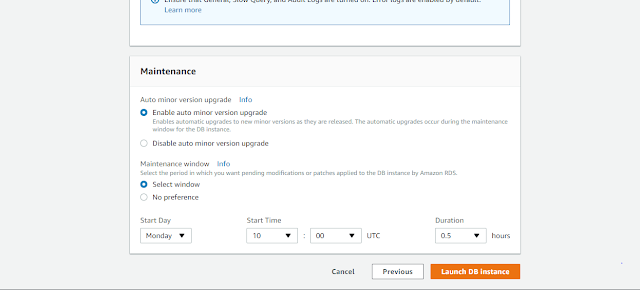
Next one is maintenance option.Here we can enable or disable auto minor updates and can set time for that.Here we are enabling that and set time for that.
Now click on launch DB instance and our rds instance will be launched.
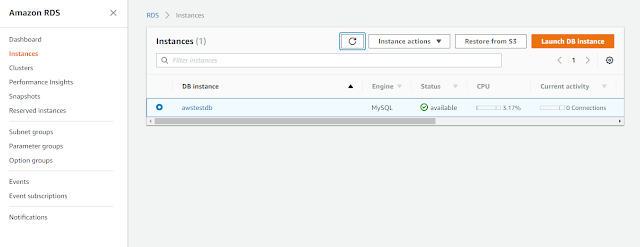
It will take some time for creating .Once it is created we can get details about it by clicking on it.From there we can get our endpoint.copy that endpoint and use it at the time of login.
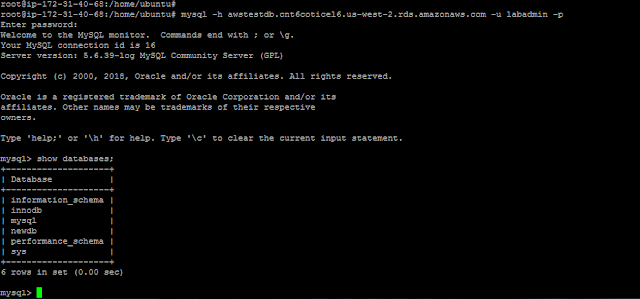
Here we are loging from a linux machine
#mysql -h enpoint-name -u username -p
Now we will be able to login to our rds instance.
To take a snapshot:
Select our rds instace > From instance options click on snapshot.On the next window that appears give the name of snapshot and click Take Snapshot.We can also restore our rds instance from these snapshots.
To deleted rds instance:
From Instance options > click on delete.Now type "delete me" and fill the widow that appears and click delete.
Similarly we can also modify our existing rds instance by clicking modify from Instance options.
From AWS RDS dashboard click on instances > Then click on Launch DB instances.
First we need to select engine.Here we will go with Mysql engine.Then click next.On the next window appears we will select our use case.We will go with Production-Mysql and click next.
On the next window that appears we can select various options such as mysql version ,instance class,storage type,size multi-az deployment and so on.Here we selecting t2-micro as size, storage type as general purpose SSD and mysql version as mysql 5.6.39.Also we are not going with multi-AZ deployment.We can also see estimated cost over here.
Under settings we can give the db identifier name.Also we can give username and password for it.
Under network and security give the details about subnet and vpc. Here we are giving subnet and vpc which is already created.Also we can give public accessibility.Here we are giving yes since we want to access database from outside the vnet. Also we want to select security group for our rds instance.
In database options, we can give the name of database which is to be created and also port number.If we don't want any default database leave it blank.
On the next step we have to select our database is to be encrypted or not.
Under backup we want to select the number of days in which backup to be take place.Her we are selecting 7 so that once in 7 days the backup will occur.Also we can select the time for that.
On next option we can disable or enable monitoring.Here we are disabling monitoring.On log options we can enable logs if we want.Here we are not enabling that.
Next one is maintenance option.Here we can enable or disable auto minor updates and can set time for that.Here we are enabling that and set time for that.
Now click on launch DB instance and our rds instance will be launched.
It will take some time for creating .Once it is created we can get details about it by clicking on it.From there we can get our endpoint.copy that endpoint and use it at the time of login.
#mysql -h enpoint-name -u username -p
Now we will be able to login to our rds instance.
To take a snapshot:
Select our rds instace > From instance options click on snapshot.On the next window that appears give the name of snapshot and click Take Snapshot.We can also restore our rds instance from these snapshots.
To deleted rds instance:
From Instance options > click on delete.Now type "delete me" and fill the widow that appears and click delete.
Similarly we can also modify our existing rds instance by clicking modify from Instance options.


